Sunday, December 29, 2013

Artist Tip #23 - Using Symbols to Simplify Shapes - Part 2

In our previous artist tip, we introduced the idea of simplification through using symbols.  We shall continue this discussion by introducing additional symbols that represent items often making an appearance in our paintings.  It remains each artist's task to identify the objects that he/she paints frequently, and to develop symbols to represent these objects in the way he/she prefers.

In landscapes, one often must represent a deciduous forest, as in Lake Lucerne Sailing:


Here the deciduous tree mass is represented by a single mass of color, with some variation in hue and value.  The edges are rough-brushed to represent the rough edges of trees, and a few trunks and branches are suggested.  The gives a much simpler and more appealing representation than actually trying to paint each tree in the mass.

The painting Porta Nigra shows symbols for both figures and wet ground:


It's important to develop an aptitude for painting figures in the landscape.  Without figures, many landscapes look vacant, as though a bomb has dropped.  Figures in the landscape must be in the same style as the rest of the painting.  For example, if the painting is done loosely, the figures must also be painted loosely to look as if they "belong".  Wet ground is indicated by reflections.  Reflections always come directly toward the bottom of the painting.  To avoid the wet ground looking like a lake, it's important to indicate a few surface marks.  In this painting, the cracks in the concrete serve this purpose.

Often in landscape paintings, the background consists of distant buildings or cities.  An example of this can be seen in Evening on the Bosphorus:


In this case, a middle-eastern city is indicated simply with a mass of color, with slightly varying hue and value for interest.  The shape at the top of the silhouette, with towers, minarets, and domes, is all that is needed to suggest the city.  Drawing and painting the many actual buildings would lead to an overly busy, and likely overworked, background.

As a final example of symbols, let's look at several different skies.  In Twilight Sail, a sunset is simply but effectively indicated with yellow, pink, and purple hues:


In A Splendid Day, soft clouds give a hazy but sunny feeling to the painting:


The addition of a few rough edges to the sky in Standing Room Only changes the feeling to one of a disturbed sky, with perhaps some unsettled weather on the way:


There are many symbols that are of use to the painter who wants to paint quickly, and give the impression of looseness.  Each artist needs to determine which symbols he/she needs to develop, and practice them until their use is second nature.  Symbols provide one method to move from simply "reporting" what is in front of us to interpreting and suggesting our subject in our painting in a more creative way.

Wednesday, December 25, 2013

Marina San Giorgio Maggiore - Original Watercolor Painting

Across the Venice lagoon from St. Mark's Basilica lies a small island, San Giorgio Maggiore. It is home to a marina filled with sailboats, and its skyline is dominated by the domes and campanile of San Giorgio Maggiore church.

If you'd like to purchase this 11" x 15" original watercolor painting for $200 including shipping within the United States, you can do it securely on my website www.jimoberst.com (click on the image). There are additional paintings for sale there, and my smaller paintings are available on my other website www.weeklywatercolor.com.  Add a unique original painting to your collection!

To join my fine art e-newsletter mailing list click Here.

Saturday, December 14, 2013

Mousehole Harbor - Original Watercolor Painting

Mousehole (pronounced “mowzel”) is a picturesque seaside town in Cornwall, UK, with a beach and harbor ringed by stone jettys.

If you'd like to purchase this 11" x 15" original watercolor painting for $200 including shipping within the United States, you can do it securely on my website www.jimoberst.com (click on the image). There are additional paintings for sale there, and my smaller paintings are available on my other website www.weeklywatercolor.com.  Add a unique original painting to your collection!

To join my fine art e-newsletter mailing list click Here.

Sunday, December 1, 2013

Artist Tip #22 - Using Symbols to Simplify Shapes - Part 1

Simplify, simplify!  Representational artists hear these words over and over again from teachers and art textbooks.  If we don’t simplify the scene before us, we are likely to create a tight-looking, overly-busy painting.  It may be accurate, but it isn’t inviting and entertaining - it has no mystery; everything is clearly defined, making it difficult for our viewers to interact with the painting.  But exactly how to simplify the scene before us is not always obvious.  If we study the paintings of an accomplished artist who is thought to be “loose”, we see most of the represented objects greatly simplified.  We also notice that there is a consistency among the artist’s paintings - the simplified figures, trees, skies, sea, etc. look somewhat similar from painting to painting.  What is happening is that the artist is using symbols that he/she has developed to represent many of the objects before him/her in a simple (and loose-looking) way.  Symbol development is an important part of any artists’ pursuit of simplification.

The simplest symbol of an object is its shape.  If we are presented with only the shape of a human figure, with no internal detail at all, we immediately identify it as a figure.  This is true of most objects - a flower, a tree, a rock, a fence.  The easiest-to-recognize symbols are usually front or side views; a silhouette in 3/4 view has to be done more accurately to be easily recognizable.  If we are representing an object far away, and particularly one that is backlit, the shape is all that is needed.  For a closer object, we can embellish the shape a bit with some edge and internal details, but need to avoid overdoing it lest our painting becomes too busy and tight-looking.

In Summer on the Farm, we see gravel road
 
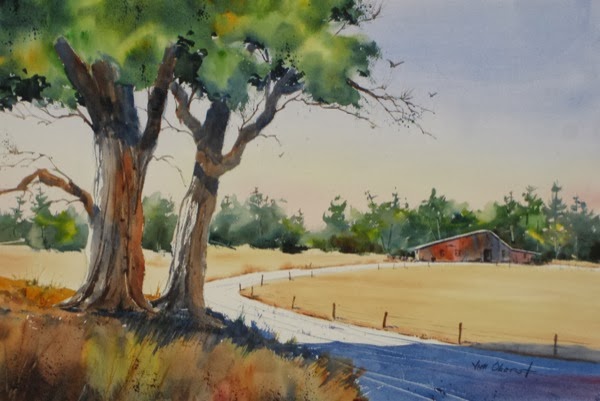
...represented simply as a shape diminishing with distance, a light value, some shadows to define its surface, a few scrapes and lines to suggest ruts, some spatter, and some weeds growing in the ruts.  Once you have mastered this symbol, suggesting a simple gravel road in your paintings becomes routine.  And look at the foreground deciduous tree symbols in this painting… rough brush marks to suggest bark, light on one side where the sun hits, a mass of color for foliage, with some rough edges. suggested leaves and a few stray branches, and a dark shadow underneath the crown.  If these trees were further away, we’d paint very little of the detail (rough bark, suggested leaves) and just stick with their silhouette.

Now take a look at the evergreen forest in Sound of Silence...


The entire forest is a single symbol.. a green mass, with yellow and orange highlights and some value variation, some rough edges, and evergreen tree shapes sticking up above the major mass.  It’s darker at the bottom to anchor it to the ground.  There are a few trunks and branches suggested by scraping some paint away, and a few hanging branches are indicated at the edge of the shape.  Don’t forget that a good shape has incidents at the edges - see Artist Tip #21 to refresh your memory of this.  For the forest on the right, smaller and further away, we use the same symbol but greatly simplified, just a mass of color with a few tree shapes sticking up.  If, instead of developing this symbol, we tried to paint exactly what we see, we would have a very tight-looking and less interesting painting, with lots of individual trees and branches.  The overall shape is the thing!

Now consider the water and reflections in Off Port Clyde...


The calm water is indicated by just a few soft horizontal lines, and gradual darkening as it comes toward the viewer.  The slightly random hard-edged reflection also suggests that the water is calm.  Note that in this painting, the water, sky, and distant land are all symbols, while the boat itself, the subject of the painting, is rendered in detail.


Early Snowfall also shows calm water.  You can see the horizontal lines, but here a wet-into-wet soft reflection is used.  Both hard- and soft-edge reflections are legitimate symbols of reflections of objects in calm water.

In Beyond the Surf, we see surf and rough water....


There are no reflections.  The rough water is indicated by some thin, rough white horizontal areas representing far-away waves and surf.  The pounding surf by the shore is simply a random white shape, with a rough and soft top edge, and some shading down low to represent the shadow in actual surf.  Once you master symbols like this, you can quickly indicate a rough sea, regardless of the actual weather outside.

In our next Artist Tip, we’ll take a look at a few more symbols for you to consider, to ensure that this idea is firmly established in your approach to your paintings.  If you want your representational painting to look “loose” and not photographic, it’s important to develop symbols for the major ingredients of your typical subjects so you can easily simplify the scene before you, interpreting and enhancing it rather than just “reporting” it.

Sunday, November 3, 2013

Artist Tip #21 - Good Shapes

In artist tip #9, we introduced the Elements of Design - the elements we have to work with to create our paintings.  The first element we discussed was shape.  Our entire painting is made up of shapes.  But what makes a "good" shape - one that is pleasing, interesting, engaging, and not boring to the viewer?  That's what we'll be talking about in this artist tip.  In the following, I'll take you on a journey from a bad shape to a good shape, based on my personal experience, and what I've learned from some very accomplished artists.

To begin, let's consider a very simple painting of a barn, rendered in only two values and one color, so that it's simply a shape:


Unfortunately, this is a very boring shape.  Any shape that "fits into" an approximate square or circle, as this one does, seems boring.  There is too much sameness for it to be interesting.  So, let's try to make this shape better by moving it from nearly a square to an oblong:


That's a bit better.  This is definitely less boring, but it's not going to hold anyone's interest for too long.  Let's try something else - let's give it a diagonal or oblique "thrust":


Now we're seeing a more interesting shape.  But we're not there yet.  Take a look at this version:


Here, we've added shapes and lines all around the edge of the previous version - a cupola, a weather vane, smoke stacks, shrubs, fence posts, tree limbs, a utility pole with wires, a road - that all connect with the basic barn shape.  They lock the shape into its environment, rather than leaving it looking like a cutout pasted on.  And they add lots of interest - there is plenty for the viewer's eye to wander over in this version.

So I suggest that a "good" shape has the following major characteristics:

  • two different dimensions
  • oblique
  • incidents at the edges

There are many design errors that can lead to a boring painting, but one of the major ones is not paying attention to making good shapes.  Whenever you're working on a painted shape, think about keeping its major dimensions unequal, giving it an oblique character, and adding plenty of small incidents at its edges to lock it into the rest of the painting and to make it interesting to the viewer.  And these characteristics are automatically transferred to the other shapes touching this shape - in this case, to the negative space of the background.

One of the reasons I enjoy painting ships is that they automatically create good shapes - their hulls are unequal, oblique, even curved shapes, and the masts, rigging, and sails produce many edge incidents.

If you'd like to review some of my past artist tips, you can find them all by scrolling down to the search box in the right-hand column and typing in "artist tips".

Monday, October 14, 2013

San Giorgio Maggiore - Original Watercolor Painting

The Church of San Giorgio Maggiore is a 16th century church with campanile, or bell tower, on the island of San Giorgio Maggiore in the Venetian lagoon. This is a view across the lagoon from Venice, with the marina visible at the left.

If you'd like to purchase this 7.5" x 22" original watercolor painting for $225 including shipping within the United States, you can do it securely on my website www.jimoberst.com (click on the image). There are additional paintings for sale there, and my smaller paintings are available on my other website www.weeklywatercolor.com.  Add a unique original painting to your collection!

To join my fine art e-newsletter mailing list, and have images of my new paintings and helpful artist tips delivered directly to your inbox, click Here.

Sunday, October 6, 2013

Artist Tip #20-2 - Reference Material

Many artists, who don't like plein air painting, or who cannot spend the time on site that it requires, use reference photos for their paintings.  There are many ways to organize and use references, and we're fortunate to be living in this time when there are so many technical shortcuts available.  The use of digital cameras and photo organizing programs let us collect an almost unlimited supply of reference photos at little cost.  And image editors like iPhoto, Photoshop, etc. allow us to rotate, crop, and edit our images in amazing ways.

I abandoned printing reference photos several years ago.  Now, when I need a reference, I simply transfer the image to my iPad (if it's not already there), prop the iPad next to my easel, and draw and/or paint away.  There are even apps to make this easier.  I use ValueViewer on my iPad which lets me straighten and crop my images to match the aspect ratio of my paper.


As you can see in the photo, ValueViewer also can superimpose an equally-spaced grid on my reference photo to help me to position the large shapes properly on my paper as I draw.  But, besides offering advantages, tools like this bring disadvantages to the artist who is trying to express him/her self.

Many of us artists have a tendency to copy our reference materials as exactly as we can.  Unless these reference materials are outstanding, we run the risk of producing an accurate, but boring, painting.  Artistic painting is largely about the artist's interpretation of what is before us, and copying exactly leaves little room for interpretation.  Artists should consider how departures from our reference can lead to a painting that is more interesting, expressive, entertaining, and engaging.  This is something I'm always struggling with.  I find it really hard to turn off my "engineer" left brain that wants to put everything into my painting exactly as it is!

One method some artists use to "escape" from the details of their reference material is to sketch from it, and use only the sketch for the painting reference.  This method can free one from not only the details in the reference, but also from its specific colors.

Another method is to develop symbols for recurring things in our paintings - faces, torsos, trees, flowers, lakes, skies, etc.  This approach can free the creative mind from the realities in references, and allow an artist to highly edit or even "put together" a scene, figure, still-life, etc. using symbols developed in previous paintings.  We'll discuss symbol development in a future Artist Tip.

The real question for an artist is "what is my interpretation of this subject?", not "how well can I record what is in front of me?"  For example, here are two paintings I did from the same reference.  The first is a fairly realistic copy of what I captured with my camera.  The second is an attempt to capture the feelings I experienced in Venice.  It has very little detail, but lots of feeling.  Which do you find more appealing?


Another difficulty with reference photos is the distortion that the camera lens can create.  Wide angle lenses do not "see" as our eyes see, and distort shapes and perspective.  Often the very light parts of a photo are "washed out" while the darks are more black than they appear to our eyes.  We need to be aware of these distortions and to compensate for them in our paintings.

One more topic that should be discussed is the use of other people's reference photos.  In general, artists should use only their own photos for references, unless the photographer gives them specific permission.  There are many very talented photographers, and using their photos as references for our paintings is essentially "stealing" their creative compositions for our own use.  There are obvious exceptions - using photos provided by a client for a portrait, or copying another's photo (or painting) for practice (these need to be consigned to the drawer, and not exhibited or sold) - but in general, choosing and composing our subjects is part of our artwork, and should not be compromised by using another's photo reference.  Many competitive painting exhibitions specifically prohibit employing other people's references.

I'd love to hear from other artists about how they handle painting from reference photos.

Monday, September 30, 2013

Marina San Giorgio Maggiore - Original Watercolor Painting

A view across the Venice lagoon of the marina on the tip of the island San Giorgio Maggiore. The church with its campanile dominates the view behind the marina.

If you'd like to purchase this 15" x 22" original watercolor painting for $300 including shipping within the United States, you can do it securely on my website www.jimoberst.com (click on the image). There are additional paintings for sale there, and my smaller paintings are available on my other website www.weeklywatercolor.com.  Add a unique original painting to your collection!

To join my fine art e-newsletter mailing list, and have images of my new paintings and helpful artist tips delivered directly to your inbox, click Here.

Sunday, September 15, 2013

Artist Tip #20 - Center of Interest

The Center of Interest (COI) is a relatively small area that is more attractive than the rest of the painting, and serves as a focal point for the eye.  It's a resting place from which round-trip excursions are made to the other parts of the painting.  Without it, the painting lacks order.

The COI should answer the question "What do I want to say in my painting?".  It should be something interesting - often something alive or man-made.  Despite its name, it should not be at the center of the paper or canvas, but at a different distance from all four sides.  It should be relatively small and attractive.  Ways to make the COI outstanding include giving it the most value contrast, the highest chroma, the most detail.

In the painting Big Cat, the large catamaran has the strongest value contrast and the most interesting detail in this painting.  There's no doubt that it is the COI:


In Midlands Country House, the strong contrast between the white wall of the house and the rest of the painting, including the dark window panes, makes it clear that it is the COI:


Besides making the COI interesting and attractive, one can use other constructs to lead the eye to it, including converging lines leading to it, objects pointing to it, and people or animals facing it.

In Snowy Mantle, there are several lead-ins toward the barn, which is the COI - the road, and the fence lines on the left and right:


In Mountain View Barn, not only is there a road leading to the front of the barn, but there's a figure facing toward it as well:


Placing the COI at a good location raises the question, how should we best split up areas in our painting?  Firstly, the ratio 1:1 should be avoided, because it is boring.  Classical art suggests that the golden mean ratio of 1:1.618 is optimum, but approximately 1:2 works fine as well.  This works not only for placement of the COI, but also for placement of the horizon line, large verticals (trees), etc.  Note that in the examples above, the COI's are  not in the center of the paintings - nor are the horizon lines.  In Off Port Clyde, the tall mast is not placed in the middle of the painting, but to one side, to avoid cutting the painting into two equal pieces.  The boat here is another good example of a COI:  non-central location, high chroma, high value contrast, and interesting:


So... when you are planning your painting, think hard about your Center of Interest - is it interesting, what does it say, and how can I make it stand out - and you will be halfway home to a well-designed painting.

Thursday, September 5, 2013

Along the Grand Canal - Original Watercolor Painting

This scene is of the walkway along the grand canal in Venice, in front of Saint Mark's square, near the vaporetto stop. The buildings in the background are across the grand canal - the old customs house, and Santa Maria Della Salute Church.

If you'd like to purchase this 11" x 15" original watercolor painting for $200 including shipping within the United States, you can do it securely on my website www.jimoberst.com (click on the image). There are additional paintings for sale there, and my smaller paintings are available on my other website www.weeklywatercolor.com.  Add a unique original painting to your collection!

To join my fine art e-newsletter mailing list click Here.

Sunday, August 18, 2013

Artist Tip #19 - Design Guidelines: Dark Edges

We continue our conversation about Design Guidelines with a discussion of how dark edges can improve our paintings.  First, let's consider the doorstep... darkening the lower portion of our painting can bring design benefits, and fits particularly well into landscape paintings.  It can

  • take a mostly mid-value painting into a more interesting value pattern
  • cause the viewer to skip over the foreground and enter into the major part of the painting
  • in water, it's natural for the water closest to the viewer to look darker due to the angle of sight
  • on land, a dark shadow can be inserted without having to describe its source

This device is used in the painting Heading In, where the dark foreground sends the viewer directly into the middle distance of the painting:


And in On the Farm, the shadow in the foreground has the same effect.  Shadows like this can be added as a last step in a painting, and need not be closely related to any object in the painting:


The frame is a similar compositional device.  Placing mid-value or dark objects on one or both sides, and even on the top, of a painting, can have some of the same benefits as the doorstep, and some others:

  • take a mostly mid-value painting into a more interesting value pattern
  • keep the viewer away from the edges and trap him/her in the major part of the painting
  • enhance the illusion of depth
  • in urban scenes, tall buildings can provide a frame
  • in rural scenes, trees can provide a frame, even at the top edge

On the Farm above shows the effectiveness of a dark tree branch at the top corner of a painting.  Besides keeping the viewer away from the top and right edge, its obvious closeup provides a feeling of depth to the rest of the painting.  Copenhagen Street Scene shows how a dark building can be used to "frame" one side of an urban painting, while also "pushing back" the rest of the painting:


And Bathhouse Row below shows a scene framed on the left and top by dark leaves, trapping the viewer in the center of the painting:


Finally, the extreme case is incorporation of darks on every edge of the painting, constructing a tunnel through which we view the major part of the composition.  The painting Twilight Sail is an example of this approach:


So, in general, dark edges can help to improve the value range, keep the viewer inside the painting and focused on the main subject, and increase the feeling of distance in the painting.  If a particular painting seems weak, simply adding some dark edges may rescue it.

If you don't want to miss any of my artist tips, sign up for my fine art e-newsletter Here.  It always has a link to my latest tip.

Tuesday, August 6, 2013

Venice Canal - Original Watercolor Painting

d0710: A gondolier plies his trade on one of the narrow canals in Venice.

If you'd like to purchase this 11" x 15" original watercolor painting for $200 including shipping within the United States, you can do it securely on my website www.jimoberst.com (click on the image). There are additional paintings for sale there, and my smaller paintings are available on my other website www.weeklywatercolor.com.  Add a unique original painting to your collection!

To join my fine art e-newsletter mailing list click Here.


Sunday, July 28, 2013

Artist Tip #18 - Design Guidelines: Value Patterns, Part 2

Our last Artist Tip #17 discussed the importance of value patterns to painting design, and suggested doing one or several value sketches to plan the value pattern of our painting.  We introduced six "standard" landscape value patterns, where the foreground, mid-ground, and background each take on one of the three value ranges (light, mid, or dark).  In this tip, we'll introduce several more "standard" value patterns for your consideration.

These four very useful standard value patterns I'll call principal value patterns:

  1. a large dark shape on a mid-value field
  2. a small light shape on a large dark shape on a mid-value field
  3. a large light shape on a mid-value field
  4. a small dark shape on a large light shape on a mid-value field

These are illustrated in the following figure:


The painting Off Port Clyde is an example of principal value pattern 2. The white details next to the dark hull make a striking value statement:


The painting Cotswolds Farmhouse is an example of principal value pattern 3 - the light farmhouse shape contrasts well with the mid-value of the background:


Several other value patterns you may want to consider are light, dark, and mid-value shapes placed adjacent or overlapped throughout the painting, or all 3 values blended across the painting using gradation.

These "standard" value patterns have been presented to help you get started in planning the value patterns of your paintings.  But realize that you can adopt any value pattern that looks good to you - just be sure to do your value planning before you start painting, using small value sketches!  These principles apply to all paintings, regardless of subject.  Still lifes, portraits, and abstracts require the same value planning as landscapes to be successful.  Value is always king!  In the portrait below, Biker, the light value of the beard and the dark background do much more to make this a successful painting than do the colors that are used.


Saturday, July 20, 2013

Venice Working Boat - Original Watercolor Painting

Venice allows no land vehicles, so everything and everyone must be moved by boat. In this scene of the Grand Canal, a working boat (truck) plies its trade among the vaporettos (waterbuses), pleasure boats, and Venetian gondolas.

If you'd like to purchase this 11" x 15" original watercolor painting for $200 including shipping within the United States, you can do it securely on my website www.jimoberst.com (click on the image). There are additional paintings for sale there, and my smaller paintings are available on my other website www.weeklywatercolor.com.  Add a unique original painting to your collection!

To join my fine art e-newsletter mailing list click Here.

Sunday, July 7, 2013

Artist Tip #17 - Design Guidelines: Value Patterns

In previous artist tips, we covered the elements and principles of design.  Now, we'll cover some design guidelines: a number of suggestions to help us translate the generic principles of design into very practical approaches to improve our paintings.  The first guideline we'll discuss is perhaps the most important one: the creation and use of value patterns.

To be as successful as possible, a painting needs a wide range of values, from the very lightest to the very darkest.  A value pattern is the pattern of light, mid, and dark values in your painting.  The value pattern is king! It is the first thing we see when we look at a painting... before color, texture, etc.  A "good" value pattern will organize your painting and make it interesting.  A painting with a poor value pattern will be boring.

To be as successful as possible, a painting needs the entire range of values, from the very lightest to the very darkest.

So, how do we create a good value pattern for our painting?  The easiest way to plan our value pattern is to make a small, a quick value sketch (perhaps 3x5" or 4x6") of the major shapes in the planned painting, and fill in those shapes with 3 values of pencil shading or marker.  These 3 values represent the 3 value ranges that we discussed in Artist Tip #9.  This is the most important step you can take in designing your painting for success - most serious artists do this!  By doing several different value sketches for the same painting, you can compare several designs quickly and easily, and choose the value pattern with the most impact.  It can thus free you from slavishly copying your subject.  This is a lot better than painting a complete painting and then discovering that it has a weak value pattern and has to be repainted.

Here's an example of a very quick and simple pencil value sketch that I did to plan a painting:  I chose light values for the sky and water, medium for the city silhouette and sails, and dark for the boat hulls.

The corresponding painting was titled Evening on the Bosphorus, and followed pretty closely the value sketch, with a few small variations and enhancements:

But how does one get started on planning "good" value patterns?  One way to start is by trying some "standard" value patterns, which I'll explain here and in the following artist tip.

To begin, consider the following approach for landscape value patterns.  Almost all landscapes have three major shapes:  foreground, mid-ground, and background.  Simply assigning one of the three values to each of these shapes, and then trying several variations, can give the artist several possible value patterns to consider.

Here are a few sample paintings (both Hawaiian subjects) where these "landscape" patterns can be seen.  First, in Kauai North Beach, a dramatic effect was achieved with a light foreground, a dark mid-ground, and a mid-value background:

Our next example, Keanee Peninsula Maui, has a dark foreground, a light mid-ground, and a mid-value background:

In our next artist tip, we'll consider several more general value patterns that can be applied to all sorts of subjects.  Stay tuned!

Wednesday, July 3, 2013

Joseph Zbukvic Workshop

I just completed a 5-day watercolor workshop in Fallbrook, California, taught by Joseph Zbukvic, a modern master of watercolor.  Joseph completed over 10 demonstration paintings, all the while drumming into us students the basics of how he sees things, and how he paints.  He was completely free and generous with his insights and information, and spent a lot of time with students individually, helping us each to master the areas where we just "didn't get it".  What a great teacher!  I recommend his workshop to all watercolorists, particularly those who are intrigued by the landscape, and want to paint directly, without endless thin washes, to capture a scene quickly with the sparkle and immediacy of watercolor.  Here's our class; Joseph is in the middle with the "Z+U" shirt:


I've posted Joseph's demos and my own workshop paintings on my Facebook art page.  Enjoy!

If you'd like to sign up for my fine arts newsletter, you can do so Here.

Saturday, June 22, 2013

Off Port Clyde - Original Watercolor Painting

This sailboat was moored in Port Clyde harbor, St. George, Maine. You can see some of the islands in the background, and plenty of lobster trap markers bobbing in the harbor.

If you'd like to purchase this 11" x 15" original watercolor painting for $200 including shipping within the United States, you can do it securely on my website www.jimoberst.com (click on the image). There are additional paintings for sale there, and my smaller paintings are available on my other website www.weeklywatercolor.com.  Add a unique original painting to your collection!

To join my fine art e-newsletter mailing list click Here.

Sunday, June 16, 2013

Artist Tip #16 - Painting Lines

Usually when we paint, we concentrate first on the largest shapes, and don't get to the details until the end of the painting process.  In workshops that I teach, I see many students struggling to finish a painting well, because of the lines needed.  For a sailboat, for example, the rigging must be painted with a light touch to be convincing.  But I often see thick, wavy lines painted on an otherwise excellent artwork that ruin the overall result.

So, what's so hard about painting lines?  The answer is making them look "painterly" - artistic, loose-looking, and not awkward.  Here are some approaches I've learned to paint good-looking lines.

Lines are easiest to paint with a proper brush, and there are three that I use in various circumstances - a rigger (thin, long hairs ending in a point), a script (thin, long hairs trimmed flat at the end), and a "bulb rigger" or "needle-point" brush (like a rigger, but with a bulge of extra hair near the ferrule to hold more paint).  A normal round brush with a very sharp point can also be used.


I find a rigger or needle-point brush best when painting thin lines.  My advice is to do all lines, both straight and curved, freehand.  This gives the best line quality.  (If you must use a ruler, hold it at 45 degrees to your paper or canvas, and run the brush ferrule along the edge of the ruler.)  Load your brush with paint and try a few practice lines on scrap first.  Use a light touch and go quickly - lines look most painterly when they're slightly broken, so don't press too hard.  And the most important thing is: do not look at the point of your brush, look at its destination.  This is not easy to do at first, but it's important.  If you look at the brush point as you're painting your line, I guarantee your line will wiggle in an ugly way.  It's not a big problem if your line doesn't go exactly where you wanted it to.  Slightly missing your exact goal will make your painting look looser and more painterly.  It's usually better to leave a poor alone than to try to correct it.


Another suggestion I have is to reposition your paper or canvas to take advantage of the natural swing of your arm.  If you're right-handed, it's easiest to paint a smooth line diagonally from your lower left to upper right as shown in the photo above, so move your painting so that the line goes in that general direction.  I find it difficult to paint smooth vertical thin lines without turning my paper at an angle.  Horizontal lines are easier to do without moving your painting.

I use different methods to paint thick lines.  These look best when broken or "skipped", especially for objects like wooden masts.  One approach is to use a rigger or script brush, load it with paint, and lay it on its side along the line to be painted.  It can then either be dragged along the line, or "patted" along the line, to make the line interesting.  I've also used the edge of a credit card or razor blade dipped in paint and moved slightly sideways along the line to give an interesting texture.


Finishing a painting should be the most enjoyable part of the painting process, and you don't want to spoil an otherwise good work with ponderous, wiggly lines when thin, painterly lines are called for.  So practice painting lines before you add them to your almost-finished painting!

Wednesday, June 12, 2013

Go Fly a Kite - Original Watercolor Painting

This is one of my very few abstract paintings.

If you'd like to purchase this 11" x 15" original watercolor painting for $200 including shipping within the United States, you can do it securely on my website www.jimoberst.com (click on the image). There are additional paintings for sale there, and my smaller paintings are available on my other website www.weeklywatercolor.com.  Add a unique original painting to your collection!

To join my fine art e-newsletter mailing list click Here.

Sunday, May 12, 2013

Artist Tip #15 - Flattening a Finished Watercolor Painting Revisited

This is a tip specifically for watercolor artists, though there may be applications in other mediums - I just don't know.  In Artist Tip #2 we discussed several methods of flattening a completed watercolor painting - getting the ripples out that occur due to uneven wetting and drying of the paper during the painting process.  The method that worked best for me was misting the back of the painting and pressing it flat under a board and weights for a few days.  I've now abandoned this method, and moved on to a higher-tech method which allows me to flatten a painting perfectly in just a few minutes.

I recently read an article in the April 2013 issue of Watercolor Artist Magazine about artist Don Weller's western-themed paintings.  This article mentioned that Don flattened his finished paintings in a dry-mount press.  This sounded good to me, so I contacted Don, and he described his process to me on the phone.  After our discussion, it sounded even better.

I found that a number of sellers on ebay offer dry-mount presses that they procured as surplus government equipment.  After studying the various types available, I settled on a Seal Jumbo 150 press because there were a number of these offered, the price was reasonable for me (in the $150 range including shipping), it was a manageable size, and it was large enough to flatten an eighth- or quarter-sheet painting in one go.  Larger paintings can be flattened in sections.  Here's what this press looks like:

The flattening process is pretty simple.  Turn the press on, set to its lowest temperature - 180 degrees F.  Let it warm up for 5 or 10 minutes.  Then insert the painting, face down, into the press, on one of the fiber boards that came with the press.  Put a sheet of brown paper over the back of the painting (it's the top surface of the press that heats up).  Now, close the press, wait for about 30 seconds, and then open the press and remove the painting.  Voila! - a perfectly flat painting.  If the painting is larger, I just flatten it in sections, and no marks are discernible between the flattened areas when I'm done.

So - if you're a watercolor painter like me who paints lots of paintings, you may want to consider this quick and easy way to produce a perfectly flat painting ready for framing.

Thanks do Don Weller for introducing me to this method.

If you've missed some of my artist tips, you can retrieve all of them by finding the search box in the right-hand column of this blog, and searching for artist tips.